We take measurements every day to control processes and to accept or reject products. Often, there is little thought that goes into understanding the measurement system. We take it for granted that the numbers are good.

The quality of a measurement system is determined by the statistical properties of the data that are generated. We know, for example, that when the same person measures the same part with the same instrument that there can be different results. This is termed "repeatability" - repeating the measurement activity but getting different results. Additionally, different operators using the same tool to measure the same parts can get different results. This is called "reproducibility" - reproducing the measurement activity but getting different results.
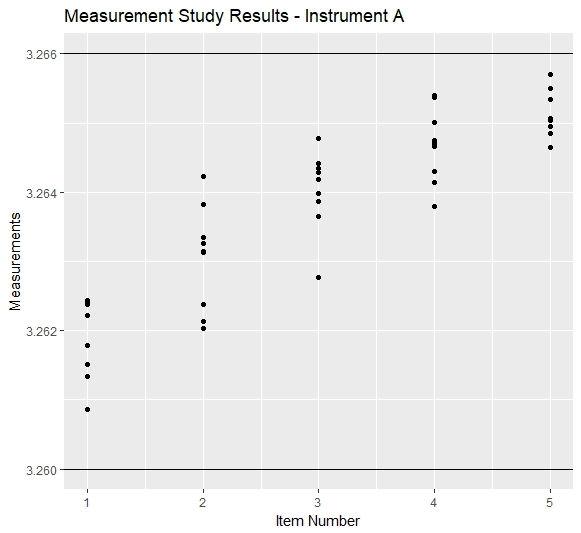
The chart below shows the results of a Gauge Repeatability and Reproducibility (Gauge R & R) study on five parts measured three times each by three inspectors (5 x 3 x 3 = 45 data points). The five parts were selected to cover the range of the process output. The reason for this is that we want to see the variability in the measurements along with the variability in process output. You can see that Instrument A (their old measurement tool) has a lot of variability.
Looking just at the data for item #2 we see that the readings vary from 3.262 to just over 3.264. The part didn't change and the measurement instrument didn't change. This range of readings is caused by the statistical properties of the measurement system - repeatability and reproducibility.

The lines on the chart at 3.260 and 3.266 represent the limits of process ouput. So the range of process output is 0.006 units wide (3.266 minus 3.260) . Looking at the range of readings for each item, we can estimate visually that the variability due to the measurement instrument is approximately 0.0015. So in this case, the variability caused by the measurement instrument is about 25% of the variability in the process (0.0015 / 0.006) and that is too much. The measuring system needs to be changed.
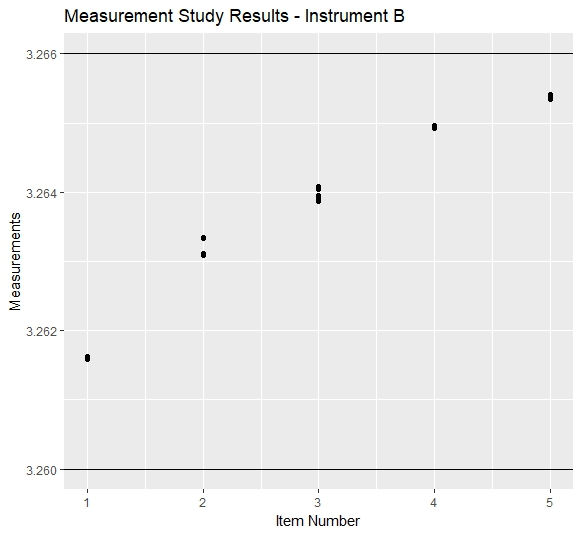
The process owner was interested in a different measurement instrument so we ran a gauge R & R to see if it was a better tool. The chart below shows the results from the new instrument. Note that we used the same inspectors, same parts and same number of readings for this study.

The range of readings for each item in this data set is approximately 0.0003 and represents just 5% of the variability in the process (0.0003 / 0.006).
This new instrument has better statistical properties and is much more capable of distinguishing between the parts. By switching the measurement instrument, we have removed a dominant source of variability in the data. This is a key activity in problem solving.
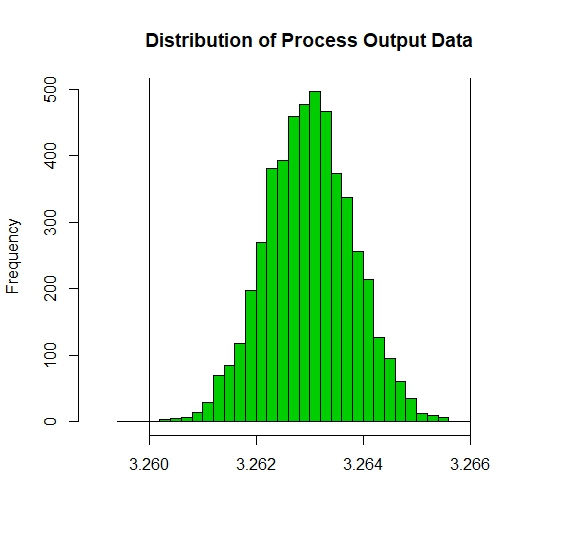
When you have a data set of your process output that yields a histogram like the one below, you need to determine the largest source of variability that is driving that process.
Your process variables will include raw materials, equipment settings, operator biases and more.
The data that you generated from the process includes all these variables and the measurement system. It is a good rule of thumb to always confirm first that the measurement system is not a major contributor to the distribution of the data.

There are plenty of resources available to show you how to run a gauge R & R study. The purpose of this brief article is to teach the concept.
I hope you find value in this article and consider assessing your measurement systems. Industrial problem solving requires that you distinguish between facts, opinions and beliefs. Gauge R & R studies help to quantify and thereby provide factual evidence of performance.
About the Blogger
I have a keen interest in understanding process behaviour and a lot of experience with industrial problem solving primarily in manufacturing. I provide consulting and training services to manufacturers and can help your team develop their analytical skills.
chris@belfield.ca
